Pottery of the 70s

Three thrown pots from the 70s


In this new post, I look closely at the handmade pottery I bought for my plants in the 70s when, for a brief time, I managed what had to be the grooviest store in Palo Alto, CA: Shady Lane on the corner of University and Cowper, which sold cut flowers, houseplants, batik clothing and agate windchimes. It is still in business, now in Menlo Park, with one of the original owners and a slightly different sales model. And I still have my pots.

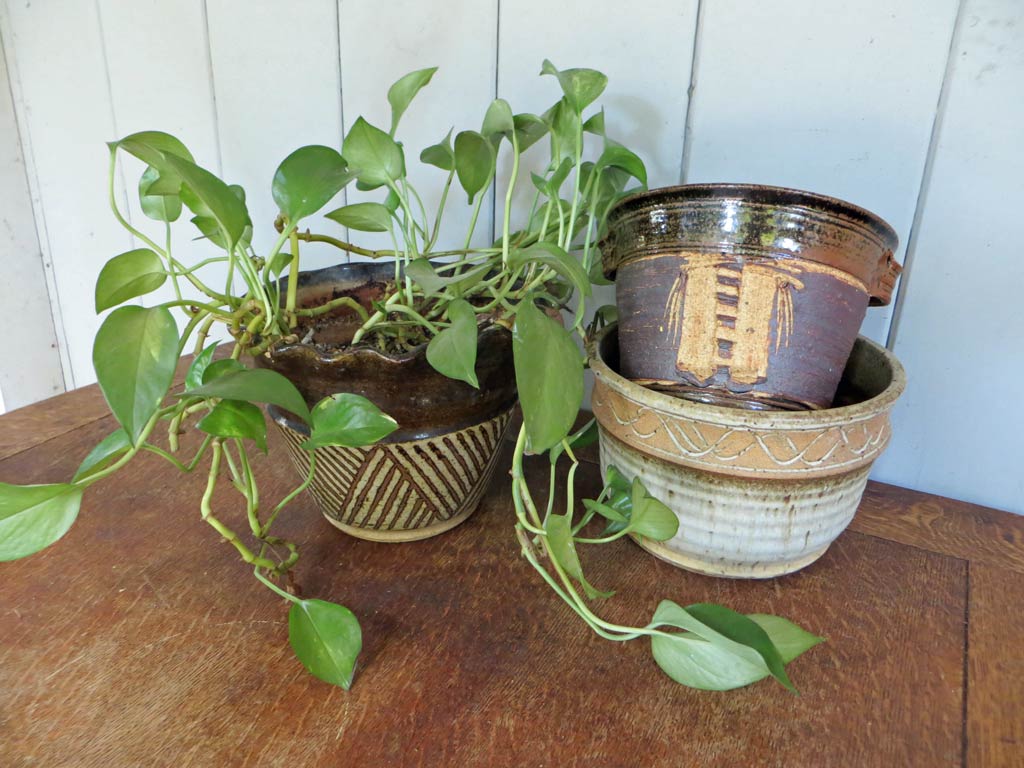
I bought them wholesale, directly from the potters, who came by with their stuff for me to select for the shop. If I remember correctly, they were each about $6, retailing for – my goodness! – $12. (Which is $68.17 in today’s dollars.) Two have the same iron oxide brushscript ER on the bottom and one has no potter’s mark. Since discovering ceramics for myself 30+ years later, I wonder even more about the makers. Are they still potting? Who is ER? Anyone out there have a clue?

They sport those stoneware clays and earthy 70s glazes, many of which I can name now: the classic high-fired goodness of Tenmoku, White-Orange Matte, Black Iron Oxide. A sensibility derived in part from a late 20th Century Japanese influence which still lingers, especially in colleges. (One I have to admit I personally wanted OUT of as soon as possible.)

The pieces are expertly thrown and altered, being quite sturdy but not in the slightest clunky, each sporting at least one inspired extra feature. Two are planters, the bucket top right is a cachepot. The bold carving through the layer of oxide on the bucket always tripped me out. HOW???? So deft and yet so loose that the potter left the carved-out rumpled curls in many places. Ah, and then I figured it out: they threw/decorated/carved at the leatherhard greenware state, of course! Education opens eyes.

The planter on the left’s flared and ruffled upper rim is just right, not too forced or too happenstance. A master knew when and how to touch. But I still can’t quite get how they created those striped zig-zags on the bottom. Maybe a wax resist pattern first? Yeah, that’s it…

The planter on the lower right is the most workmanlike. Nice division of space and throwing rings to catch the glaze. The biorhythmic wavy carving could be better, but it’s a nice organic touch with the glaze wiped back to reveal the lovely warm clay body.

It’s hard to overstate the houseplant mania of that time. Plant stores and fern bars were everywhere. How-to books abounded. My ex-roommate worked at the downtown San Jose store (by SJSU, of course) and I started by ink-drawing plants and handlettering care information for the store owner and all his other shops. When Shady Lane was opening, he asked me to manage it. I was young and needing a Big Change, so off I moved to Palo Alto, crashing in the store’s empty second floor storage area until I found a – what else? – garden apartment.

When my now-husband moved in with me in that 400-square foot-apartment, (the same one where this happened) we had a combined total of around 90 houseplants. Turns out he’s the one with natural plant knack, and he has had an herb and veggie garden wherever we have lived. The Golden Pothos in the photo is the only houseplant we own now. Decades old, it’s in the same pot, alive in spite of me and my black iron oxide stained thumb.

–Liz Crain, who also still owns a long batik skirt from back in the day, but the agate windchimes have all broken.

Share this:

Years Later, A Juicy Nomination Oils the Works

Ceramic Industrial Pitcher with Faux Repairs
Banged-Up 305S Pitcher, 2012, Ceramic


Here’s the first post in a new “”sometime series” I think I’ll call Loose Ends, with the idea being to look around my creative life and see what needs tidying up. Today’s missive is a belated virtual thank you card written due to a new understanding about a gift I received which I frankly did not understand very well at the time.


Earlier this summer my friend Patrick S. mentioned that he thought 2010 was his peak year as an artist. He had scads of examples of why that was true for him, but one especially pricked up my ears: he was nominated for a local Rydell Fellowship administered by the Community Foundation of Santa Cruz County.

Not too shabby, Patrick! The nomination process alone is pretty exclusive. The field of nominee/applicants is bursting with superb talent. The three awards given every two years are both prestigious and lucrative. When does any artist receive wide acclaim, a museum exhibition and $20,000 with practically no strings attached?  It’s basically the Art Oscars for Santa Cruz County. Even if one doesn’t win, – and only roughly one in twenty do – one can forever append “Rydell-Nominated Artist” to one’s pertinent professional descriptors.

Thing is, up until Patrick mentioned his, I had not truly valued my own 2013 Rydell Fellowship nomination for what it IS and not for what it was not. I am certain I did my best with the only requirement: 12 images of my finest works (the piece up top is one.) I delivered my Image CD and Application in person, trailing clouds of glory, and then went off to Mono Hot Springs on a late September vacation you really need to read about.

In December came the lovely rejection letter. Once I saw that it mentioned there were 62 nominees and named the 55 who actually applied as well as the three winners, I was at peace. That list was a Who’s Who of local creative glitterati, many I knew. To be included at all, was, as the letter read, to be a “part of a remarkably talented pool of artists whose work reflects this region’s artistic quality and diversity. The [national] panel expressed their regard for the breadth and vitality of the artists’ work they viewed.”

Breadth and Vitality! Remarkably Talented! Quality and Diversity! Why did I miss theses accolades and only notice the Not Winning part? Why did I put away all my files and never mention the experience to anyone? Hrmmm…

Answer: It’s only human! When the eyes are trained on the prize, a lot goes missing in the service of that focus. Unless…

Unless and until one wakes up to the whole of it, maybe years later. Until now. Thank you Patrick, for opening my eyes to the monumental significance of being nominated at all. It was a high point in my own artistic career, too, and one I would love to repeat, now that I get it.

Belated Deepest Thanks to the arts organization that nominated me: I treasure your support and confidence whoever you are and wish I could have done you proud.

So I am slow on the uptake, but seeing this juicy nomination in a prouder light is oiling my newest studio endeavors. I’m feeling a tad more artsy, a smidge more deserving, a soupçon more saucy and will soon have a whole new range of work I adore to show for it.

— Liz Crain, who has graciously taken her seat among the rare cadre of Rydell Fellowship Nominees and will be adding it to her resume in its next update.


Share this:

Reclaiming Clay: A Rationale and Pictorial How-To


The Summer Re-Run Blog Posts are running down. This might be the last one, but it’s a goodie; one where the comments are probably more interesting than the post itself. Originally published September 26, 2012, it speaks to a grown-up awakening regarding resources and costs. And while this is still a great method, I no longer work this way and my clay scraps have been reduced to near ZERO. I will let you have fun reading about this small scale reclaiming method (and be sure to peruse the comments!) and then, in the sign-off, I will tell you what I do now…Enjoy!


So, how is it that I didn’t learn this early on in my clay career? And, even curiouser, once I did learn it, why did I not practice it until 2012? It was clearly due to a perfect storm of economics and sloth, involving

• A very handy and dirt-cheap (pun intended!) source for clay

• An all-too-convenient method of dumping all scraps into a group recycling process

•  A strong streak of fastidiously-fed laziness cloaked in an utter lack of interest

I had no compelling reason to deal with my scraps. Being a slow-working hand-builder, I also just don’t create the massive leftovers like those wheel-throwing potters do, therefore I was not especially forced to deal with them. The scraps easily disappeared and all I had to do was open a nice fresh bag of just-right clay instead. It was that way for a decade.


In the past year, however, compelling reasons and needs to deal with leftovers have come to town:

• I pay retail for my clay now.

• It’s a hassle to get all those heavy buckets of dried chunks over to the college to feed to their recycle stream, and they take up a lot of room while they wait. (Plus the dog will eat them if left uncovered at his nose level!)

• I got curious about how much more work I could get out of a bag of clay if I did this.

Let’s take a look at what’s involved.

As I work, I toss my scraps into a bucket. When it’s full, I chunk them up into even-ish pieces, as in the photo up top.

Scraps get dunked and bagged.

At the end of a studio day, in preparation for the next morning, I dip those chunks – all ranges of wet to dry  – handful by handful in water for a few seconds and then into an empty clay bag.


Wetted scraps sit overnight.

I wrap the bag well and let the scraps absorb the water at least overnight, but they will keep for a long time until I’m ready to reclaim.

The really messy part that I avoided until now.

Usually the clay scraps have turned into a slippery-sticky-lumpy goo. I take this out of the bag and spread it as best as I can on a flat rectangular plaster bat. The plaster is a really absorbent surface which will suck the water out of the clay in a matter of hours, but a piece of drywall or wood could work….even canvas, just change it out if it gets too damp before the clay is workable. (Newspaper or paper towels NOT recommended!)


Did I say it was gooey sticky and messy?


The plaster soaks up the water fairly quickly.

Plaster works great. When the clay pulls away, it’s time to flop it over to the other side for awhile.


Gather the now-manageable clay and wedge it.

When both sides aren’t sticky, it’s time to ball up the scraps completely and wedge to create as even a texture as possible, in both wetness and consistency. You can throw the lumpy balls onto your wedging surface to compact and condense even further.


Pound it into a thickish slab.

Use your fists or something like this firm-squishy bouncy bonker, and flatten your wedged lumps of clay to pancakes about 2 inches thick.


Roll the slab thinner.

Then using a slab roller or a rolling pin and gauge sticks, roll the thick slabs into thinner ones. Alternatively, you can skid the thick slab along a surface to thin and stretch it by tossing it slightly sideways.


Poke holes in the inevitable air bubbles.


Air bubbles aren’t the bane for hand-building that they are for wheel-throwing, but it’s still nice to remove the obvious ones.


A few fresh new slabs from spare parts.


Continue to roll out as thin as you need for your project. I always feel rich to get this much more usable clay out of a bucket of scraps.

And that’s the easy illustrated why and how of getting the most out of your bag of clay! Do it and revel in your own bumper crop.

~Liz Crain, who now pretty much uses ALL of her clay the first time around by keeping scraps workably moist and then either generating all sorts of rolled, textured and cut test tiles and tubes which she bisques and keeps on hand for quicker answers to surface design/glazing possibilities AND/OR she forms the wet pieces back into small balls and makes lovely spontaneous pinched pieces, some of which are keepers, the rest are also testing candidates.

Share this:

What Dreams May Come

Dove at the Cabrillo College “Grave Changes” Exhibit, Davis, CA 2012


The Summer Studio Journal ReRun Posts continue, and I have a longer Preamble to this one:

It’s five years on from this post, originally published June 14, 2012. I have re-posted the true story at the end of it a couple of other times and places, since it is so delicious.

What’s not so delicious is that my mentor Kathryn’s still gone. For lots of reasons I can no longer find creative refuge in the Cabrillo Ceramics Lab. But the undeniably solid one is: she’s not there. There are some of her lovely small works and her photo in a glass case with her name writ large on the entrance doors. I am proud of her legacy, but I still hear her laughter ringing and think I glimpse her moving away similar to the first dream recounted in this post.

 As it should be by now, an artist and teacher who I admire and wholeheartedly support just earned a tenure-track position and will occupy her long-empty former office.

Here at my studio, I have a collection of her fabulous smaller works and lovely handwritten notes, which I keep nearby, occasionally shuffling them about in an afternoon’s agitation. She’s rarely in my dreams now. So it goes. What sings to me currently were her creative dry spells, her doubts. She continues to mentor me in retrospect. I get frustrated with my artistic direction at times, yet know I am compelled to continue, just as, well, just as I saw her do. She, too, wrestled with making meaning. Felt impatient with the selling, the galleries, the shows. Worried about the same stuff. And additionally carried the onus of being a teaching legend, receiving the projections of hundreds and hundreds, most of whom largely misread her humanity, mistaking her most unfairly for a demi-goddess. I hold her utter humanity as a person and a sensitive artist to heart and cry.

And for all that lovably warped humanity, here am I as well, shambling along, telling my tales. Forthwith, here is another worth repeating:

Read More >

Share this:

An E-Mail With Everything I Know About Cold Finishes


Mended Incinerator Top with Pitt Pens and Colored Pencils


The Summer Studio Journal Re-Runs just keep on comin’! This post from August 22, 2012 is essentially a reply to an email query, as you shall see. I have added a few more resources that I have learned of in the past five years, but other than that, it’s a great guide, so here it is:


I don’t get a lot of emails from complete strangers, but after a few years of an active festival, gallery and online presence, I’m starting to.

Most writers want to share a specific resource, ask an art business question, or even commission me to make something special. I take these conversations as they come and generally enjoy the new connections.

This one, however, was from a person new to ceramics in a country on the other side of the blue Pacific. The subject line read “admire your work.”

She explained she was seeking ways to decorate her ceramic sculptures without further firings.  She knew it was called a Cold Finish, but besides paints, she was finding precious little information about it.  She had miraculously stumbled across my work and was wondering how I got my pieces to look like they did. Was any cold finishing involved?

I sat down to respond to her with a few ideas and out popped the following email, which does an incredibly better job of listing Everything I Know About Cold Finishes than I ever would have written without the compelling urge to help another beginning ceramics enthusiast. It’s one more reason I enjoy ceramics: we are a community of sharers.

In that spirit, I thought to reproduce the email exactly as I wrote it the other day, with only some added bolding as enhancement. Here it is:


Hello Catherine and thanks for your lovely words!

Most of my finishes are fired to cone 6 oxidation (electric kiln) but I have a few cold finish techniques I can share with you.

Sometimes my firing results are close but not quite what I want or I want some added bling.  At those times I have found the following list of products to be useful:

Sumi Ink and India Ink, brushed into the lines and recesses of a piece and sponged off. Nice!
Golden Acrylic paints, in thin washes. I especially use Micaceous Iron Oxide which not only has fun tiny mica flecks, but I’ve learned (by accident!) that it will last through a firing….so sometimes I fire it on too.
Oil paints and watercolors are nice too, but I tend to reach for them less.
Prismacolor colored pencils: a waxy drier finish which is lightfast and can be layered for subtlety. They won’t slick to glassy glazes and do better over very dry surfaces.

(Which reminds me: most of these products are lightfast and archival, but probably not for outdoors.)

Faber Castell makes a line of PITT artist pens which have tiny ink-based pen tips, and large or small brush tips that I use more for changing the tone of an area or linear emphasis. Very nice!
Amaco makes a range of colored metallic waxes called Rub ‘n Buff which are useful for a bit of gold, silver or even blues, reds and purples, on highlights. Can help with a worn antique look.
And lastly are two brands that market adhesives and thin gold leaf variations : Old World Art and Magic Leaf. This is if you want a bit of true shiny non-tarnishing gold!

For a matte sealer, which is to me is better than a shiny clear coat: Delta Ceramcoat Satin Exterior/Interior Varnish. 

That’s my brain dump. If I think of something else, I’ll send it along. I don’t know if these products can be had locally for you, but online is sure to get you most of them.

I wish you all the best,
Liz

P.S. Most books don’t cover “post-firing” finishes, but I found an excellent discussion in Robin Hopper’s book Making Marks. He also discusses sandblasting, acid etching and cutting elsewhere in that book. There, you have all I know!


And there, you Dear Readers now have it! I would add today that these types of cold finishes are more suited to sculptural work. If you put them on pieces used for food, even on the exterior to avoid possible leaching and toxicity, they will still suffer from the washing.

Since 2012, I have also discovered an outdoor sealer that doesn’t change the look of unglazed ceramic sculpture or grout: Glaze ‘n’ Seal Waterbase Stone Sealant “Natural Look” Impregnator.

And, lastly, while they involve another very low temp firing so are technically not Cold Finishes, playing with lusters, china paints and decals is pretty fun and adds a whole other dimension to things.


~ Liz Crain,  who knows it’s all a work in progress and hopes to be saying “Ancora imparo” – I am still learning – at age 87 as Michelangelo did.


Share this:

Rust as Teacher

ceramic shot-up rusty conetop beer cans


In our Summer Studio Journal Re-Runs, let’s revisit this post from September 1, 2011 which is essentially a paean to the well-examined rusty surface. It seems the more one looks at rust, the more one sees and the deeper the story it tells. Even now, as my work is moving in other directions, the things I have learned from trying to recreate the tastiest rusty surfaces stay with me and continue to whisper. I still relish rust! Let’s see how it began.

Read More >

Share this:

Crying “FIRE!”

fire alarm

We interrupt the Studio Journal Summer Re-Runs for an new post I can’t let wait until September, thanks to the ponderings of my thoughtful virtual clay buddy Carter Gillies. Carter wondered earlier this week about the difference between an artist merely expressing herself in her art and that of her further intending to communicate to others and wishing to be clearly understood by them. A lively discussion ensued about whether being fully understood was even possible and whether it should be definitive in any way and how should an artist feel about it all, especially if understanding seemed to rarely happen?

Read More >

Share this: