An E-Mail With Everything I Know About Cold Finishes


Mended Incinerator Top with Pitt Pens and Colored Pencils


The Summer Studio Journal Re-Runs just keep on comin’! This post from August 22, 2012 is essentially a reply to an email query, as you shall see. I have added a few more resources that I have learned of in the past five years, but other than that, it’s a great guide, so here it is:


I don’t get a lot of emails from complete strangers, but after a few years of an active festival, gallery and online presence, I’m starting to.

Most writers want to share a specific resource, ask an art business question, or even commission me to make something special. I take these conversations as they come and generally enjoy the new connections.

This one, however, was from a person new to ceramics in a country on the other side of the blue Pacific. The subject line read “admire your work.”

She explained she was seeking ways to decorate her ceramic sculptures without further firings.  She knew it was called a Cold Finish, but besides paints, she was finding precious little information about it.  She had miraculously stumbled across my work and was wondering how I got my pieces to look like they did. Was any cold finishing involved?

I sat down to respond to her with a few ideas and out popped the following email, which does an incredibly better job of listing Everything I Know About Cold Finishes than I ever would have written without the compelling urge to help another beginning ceramics enthusiast. It’s one more reason I enjoy ceramics: we are a community of sharers.

In that spirit, I thought to reproduce the email exactly as I wrote it the other day, with only some added bolding as enhancement. Here it is:


Hello Catherine and thanks for your lovely words!

Most of my finishes are fired to cone 6 oxidation (electric kiln) but I have a few cold finish techniques I can share with you.

Sometimes my firing results are close but not quite what I want or I want some added bling.  At those times I have found the following list of products to be useful:

Sumi Ink and India Ink, brushed into the lines and recesses of a piece and sponged off. Nice!
Golden Acrylic paints, in thin washes. I especially use Micaceous Iron Oxide which not only has fun tiny mica flecks, but I’ve learned (by accident!) that it will last through a firing….so sometimes I fire it on too.
Oil paints and watercolors are nice too, but I tend to reach for them less.
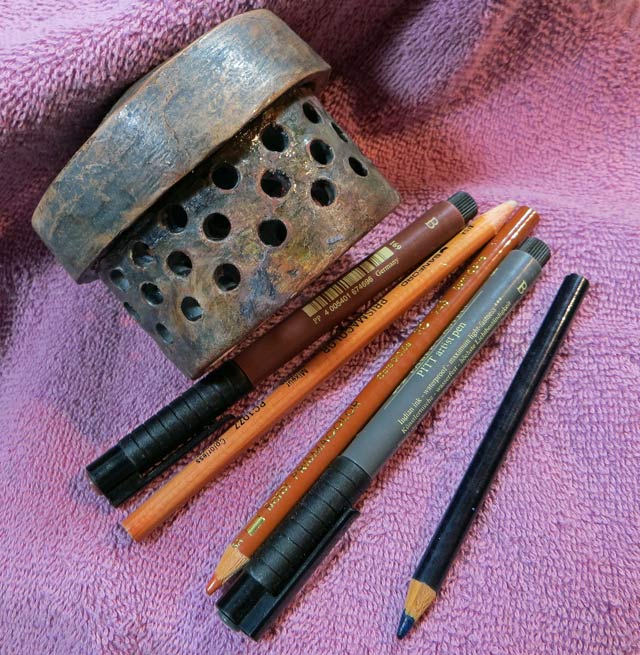
Prismacolor colored pencils: a waxy drier finish which is lightfast and can be layered for subtlety. They won’t slick to glassy glazes and do better over very dry surfaces.

(Which reminds me: most of these products are lightfast and archival, but probably not for outdoors.)

Faber Castell makes a line of PITT artist pens which have tiny ink-based pen tips, and large or small brush tips that I use more for changing the tone of an area or linear emphasis. Very nice!
Amaco makes a range of colored metallic waxes called Rub ‘n Buff which are useful for a bit of gold, silver or even blues, reds and purples, on highlights. Can help with a worn antique look.
And lastly are two brands that market adhesives and thin gold leaf variations : Old World Art and Magic Leaf. This is if you want a bit of true shiny non-tarnishing gold!

For a matte sealer, which is to me is better than a shiny clear coat: Delta Ceramcoat Satin Exterior/Interior Varnish. 

That’s my brain dump. If I think of something else, I’ll send it along. I don’t know if these products can be had locally for you, but online is sure to get you most of them.

I wish you all the best,
Liz

P.S. Most books don’t cover “post-firing” finishes, but I found an excellent discussion in Robin Hopper’s book Making Marks. He also discusses sandblasting, acid etching and cutting elsewhere in that book. There, you have all I know!


And there, you Dear Readers now have it! I would add today that these types of cold finishes are more suited to sculptural work. If you put them on pieces used for food, even on the exterior to avoid possible leaching and toxicity, they will still suffer from the washing.

Since 2012, I have also discovered an outdoor sealer that doesn’t change the look of unglazed ceramic sculpture or grout: Glaze ‘n’ Seal Waterbase Stone Sealant “Natural Look” Impregnator.

And, lastly, while they involve another very low temp firing so are technically not Cold Finishes, playing with lusters, china paints and decals is pretty fun and adds a whole other dimension to things.


~ Liz Crain,  who knows it’s all a work in progress and hopes to be saying “Ancora imparo” – I am still learning – at age 87 as Michelangelo did.


Share this:

My Backlist, A Self-Retrospective Part I: Early Forms

Second Grade Button Tile

The Art Teacher handed out a damp clay squares and baskets of buttons and said to press them in any way we liked.  I remember doing this: My seven-year-old mind was trying for a certain symmetry and, as you can see,  almost achieved it. I remember liking the simple pinwheel button the best (still do) and I remember writing my initials – E.A.H. –  into the wet back.  The finished tile re-appeared with this green glaze and I’ve had  it ever since.

Fast forward to clay work decades later.  Let’s look at a handful my earliest pieces and see what I remember about making them and what I see now with applied retrospective understanding.


Off-handed Soft Slab Dish with Shard, 1999


This footed soft slab textured dish shows a generous willingness to let the clay be clay, but not much finishing technique. The edges and that point are really sharp! And the piece rocks on its foot. I made four similar pieces, cutting the imprinted slabs with a sideswipe of a rubber spatula. My painter’s experience chose nearly-complementary colors for the glazes, as well as contrasting matte and shiny finishes.  I see that my attraction to duller/matte surfaces appeared at the beginning, even if I felt so utterly out of control that I let the materials direct me. (Which was not so bad of a choice as it sounds!)

Free Form Vase With Legs, 2001

Another matte and soft-formed piece, done “After Instruction.”  I still worked very wet, following the clay’s lead – and gravity’s – and did almost no adjusting,  clean-up or finishing work,  although the edges don’t bite and it sits steadily on its three legs.  I enjoy the organic expanding gesture of this vase and the dull white stoneware glaze with the iron oxide “burnt” areas. Flowers look wonderful in it and it doesn’t leak. I still like to make my taller vase-like pieces dance!

Walking Winged Mug, 2001

More legs! I see this Mug/Cup beginning to have real stance and gesture. The Handle-Wing is very comfortable to hold but the crudely applied leg attachments are cracking off and that one on the far right shrunk and pulled up out of the plane of the other three legs in the heatwork of the kiln. The top rim is so uneven as to not deliver beverages to the lips without dribbling. Definitely a concept piece. Love that turquoise matte glaze which is toasty where thin! I was tiring of only glazing my work and hungry for more painterly surfaces, but hadn’t a clue on how to obtain them and was flummoxed by how radically it all changed in the kiln.

Precariously Balanced Cone Vase, 2001

A radical attempt at pushing the sculptural vessel envelope in 12″ tall concept goblet which is more about form than function and proud of it. I was still letting the clay be its lumpy self, and attaching things by glazing them together. That cone shape is barely touching the flattened support and I don’t quite know how it stayed in place. I see some poked in stippling texture at the rim and a lot of drawing with underglaze chalks and pencils before sponging on the clear glaze. A daring piece which I could have never replicated….and really didn’t want to, but I was getting away from relying on glazes at last.

Quadrupedal Zoomorph Rattlehead Prototype, 2003

A few years later, I’ve got some command of my forms….up to a point. I still work the clay when it is too wet, counting myself lucky to fashion the shapes I do before it all dries. The idea of managing and slowing my drying is still exotic to me. Notice the roughly unfinished and caving legs.  By this time I’ve discovered underglazes, especially the Duncan Concepts and Mayco Stroke ‘n’ Coats which have paint-like colors, even if they are too shiny for me. Add the silver ‘cold finish’ Rub ‘n’ Buff colored wax and you’ve got “It Came From the Sea.”  This was the seminal piece for a series of 20 I developed, all on legs, all with improbable animal bodies and round hollow rattle stoppers. I called them QZRs, for Quadrupedal Zoomorphic Rattleheads. They were heavy and crudely finished, but full of heart and intention and love of the medium…and they were my original invention.

What I’m taking away from these very early pieces is an appreciation for my willingness to mess around and see what happened and then make some aesthetic decisions. That investigative spirit led me to repeatedly try nearly every technique for forming and finishing I encountered, as many times as they were presented. I read avidly, clipped articles, took classes and workshops. I often heard the same instruction and explanations with new ears and a new mind, full of wonder each time. I made all kinds of errors. I learned to throw and found I was faster working by hand and that I tended to alter my thrown pieces so completely it was pointless to start with something perfectly round. I had a decided preference for sculptural over functional, narrative over reporting.

I still persisted in working the clay too wet and then letting it get away from me, though. I did not learn for at least another five years how to maintain dampness, selectively re-wet, do the right moves at the relatively optimum state of dryness, work in pieces and attach them or how to reclaim totally dried out clay. That did not really stand in my way because I was fascinated with the work at hand and there was always plenty to learn about that. Even now, the spirit of exploration accompanies me as a permanent partner in creativity.

I also see a sense of humor in these forms, a certain verve or brio that I never want to lose. It’s good to look back and intentionally catch and preserve what matters in the long arc.

Part II will expand on my early adventures in surface decorating.

~Liz Crain is a ceramic artist and has been for longer than she thought.

Share this: