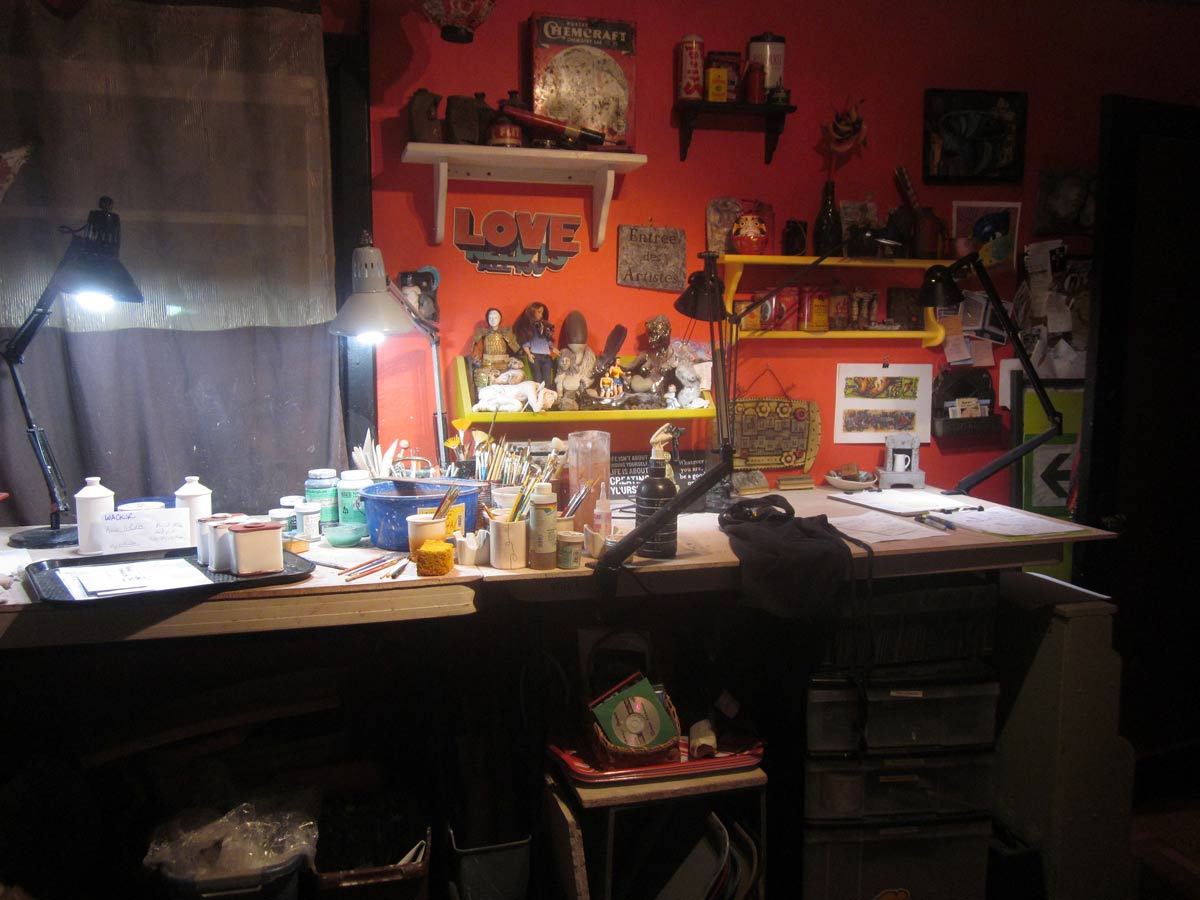
Here begins a four-part virtual Studio Tour of my ceramic-making digs. We’re starting with the North Wall and will continue in the coming weeks to the other compass points. Expect sidetracks into the crannies of my small, semi-efficient working space. I’m sharing my studio up close and personal as a way to augment my Artist Number 207 2015 Santa Cruz County Open Studio Art Tour. During that Tour, visitors can peek in, but not enter this space. Even if they could go in, they would not get this in-depth description. Besides, it’s all cleaned up then, but you’re seeing it un-staged and in use.
It’s been a hard-workin’ nonstop year. After a seven month stretch of incessant production and showing, my clay buddies tell me it’s normal to feel a bit cranky and whomped.
Thing is, my case of whomp seems to have settled in. The flavor is out of the chewing gum and I can no longer get myself to happily go in the studio, much less work on stuff waiting there.
Dare I call it Burnout? Existential Ennui? Depression? Fear? Creative Blockage?
Each year I spend a bit of time acknowledging my creative space: my studio. I call it the Annual Studio Re-Dedication and it’s as impromptu of an affair as it is sincere. This year it was both clumsy and charming, just the way I like it.
By way of prep, I clean up a teensy bit, taking note of what has physically changed about the space in the past year, as well as how I have felt in it as the seasons circled round, and the making moved through my hands.
I buy a bouquet, dig up some candles, gather some good smells, choose a nibble and a sip, cue perfect music and arrange a few meaningful objets as icons and talismans.Read More >
You’ve got a batch of wet colorful, marble-y, strata-fied slabs now, as a result of trying the underglaze decorating methods outlined in the previous thickly illustrated post, which is naturally titled LTSYW, Part One. What oh what can you do with them?
I have a hunch we have all just begun to see what. For that reason, I plan to relate the paltry few things I’ve done and noticed when I tried, and leave it at that. There really aren’t any appropriate Do This and Then That instructions from here on out, because the technique is wide open to expression and experimentation. I’ll throw down a few dots, but you get to connect them any way you discover. Lana Wilson – the source of this technique for me – says the same in her handouts: “Play.” “Experiment.” “Play. Play. Play.” I, too, learned by playing and wish that fun for you!
Before I leave my dotted breadcrumb trail, let’s take up what I think Lana is getting at when she calls herself “The Queen of Low Standards.” First, it infuses a workshop atmosphere with relaxation, fun and the gifts of imperfection. She says it more than once in the course of several hours, for tension-releasing laughs, for instant forgiveness when a demo goes awry, for purposely scrambling off the pedestal of know-it-all ceramic expert which some might have placed her on. Yet Lana is clearly conversant in the technicalities and artistry of her field. Her fingers move deftly and with intelligence. She’s as comfortable presenting a full day of hows and whys and stories to match as she is forgetting the specific word for a glaze fault. And if the audience can’t supply it, she pops it out sometime later. A clear pro at work.
There is no Fourth Wall with Lana, though; you’re in the soup with her. Pretzel logic. Crazy Wisdom. Magnetic PERMISSION. She actually handed out strips of paper with the word “Permission” on them and invited us to write down what we wanted permission to do or think or try. And voila!, we had the Permission Slip for it. The Queen is benevolent! But about those Low Standards? My guess is that keeping the way into the work accessible unlocks the largest amount of joyful possibilities and provides access for the diverse pantheon of Muses, not just those of Ultimate and Objective Perfection (if they even exist beyond our timidity!) Once we’ve allowed ourselves to play in that way, THEN we can begin to sharpen our skills, get technical, learn from our mistakes, become conversant with how this method works for us.
Back to those slabs! Here are some things I’ve learned about them when I played around.
Good to Know:
There are all kinds of ways to amend your patterns while the clay is still flat.
You can add more color if you like, probably not too wetly.
You could stamp light textures, carve lines, or roll thin scraps on top to emphasize areas.
You could even carve out “worms,” turn them over, switch them around (on both sides!) (Lana’s fun idea; she calls them fossils.)
Rolling your added textures and additions smoothe is a good idea. It sets the designs and creates a unified surface.
There is range of optimum workability when the clay still bends without cracking: pretty darn wet to “mozzarella” hard.
Thinner rolling = more stretching/fading/abrading of colors.
Patterns or templates for your planned creations might be a good idea. Lana used a tile cutter with an ejector!
It’s good to work rather deftly – ala Lana, with a light-handed clarity of purpose. What do you like to do with slabs? Try it!
Simple joins, overlapped or beveled, pressed and perhaps lightly paddled are good. Add water before attaching, if you’re so moved, but that’s it.
You might need to support your creations’ seams and walls until they set up.
Excess handling, too much water or tooling, fussy appendages: all impact the still-damp patterned underglaze and can smear, erase and create an overworked feel.
You can paint bare cut edges, say at the top of a cylinder, with a line of underglaze to complement your marbling. Lana showed us black edges which are snappy.
Alternatively, make some very thin strips and create a rolled edge. Attach with water, press well.
Dry slowly, bisque slowly, just ’cause.
You can amend with more color and washes after bisque, when the first colors are set.
Clear glaze, especially a transparent matte, looks great.
I’ve also used colored pencils, Pitt ink pens and clear acrylic satin medium to seal non-functional and purely decorative work.
All your remaining wet clay scraps have interesting new possibilities too.
Enjoy this process and make fun stuff! Happy New!
~Liz Crain, who’s found a jazzy new way to play with clay – and since her word for 2013 is “Synthesis” is excited to see what comes about when she incorporates it into the vintage faux metal work she’s done for several years now.
Legions of artists fantasize about The Perfect Studio. Whatever the particular siting, configuration and appointments, it comes down to it being a vortex of personal creative energy where the conduits of genius become pure and we are blissful.
I’ve walked around a few incredible art-making habitats, many with zen views, which gave my artist’s soul the same frissons as Disneyland’s Peter Pan’s Flight did for me at age 6.
After the thrills, though, come the tidal waves of malicious envy followed by the dirty backwash of self-admonition: “A lot of artists don’t have any studio at all!” The Voice nags. So I go clean and rearrange one more time, dutifully attempting to bloom where I’m planted.
Sometime late last year I got a case of INeedABetterStudio-itis that was not induced by envy or guilt, but by a strong re-conceptualization of how I work best. I noticed things go better for me in my creative space when:
1. It has an open feeling with largish work tables and good task lighting.
2. It has dedicated places for tools, supplies, and other necessaries and they are clearly labeled.
3. I have separate areas for wet clay forming, bone dry and bisque work, and for decorating and photographing work.
4. Deep storage and side activity supplies are not visible.
5. It is inviting and pretty easy to keep clean.
6. There’s a private feeling, separate from my household.
Those were the qualities that I kept seeking in the yellow space, a large back bedroom located off the laundry/pantry pictured below. But, I was asking too much of it. I wanted it to be an active studio as well as a major seasonal storage area, a photography studio, an Etsy Shop inventory and shipping area, a place to stage and prep my outside-the-studio teaching and volunteer projects, an art reference file cabinet and a mini meditation hall. No wonder I had no lasting success in wrassling it into a dream studio!
Free Swimming in the Creative Soup
It was clear, though, that I would not be moving off-site, out in the yard or be converting the living room. What, oh what to do besides more Sisyphean tidying? Eventually it occurred to me I could switch out two rooms by moving the active studio around the corner and down the hall to the off-the-beaten-path red room, taking only the necessaries with me and leaving the other functions behind to be joined by the exercise equipment.
And that is what I did. See the just-moving-in shot at the top of the post.
Flowers, Candles, Oranges, Incense, Salt and Rattles
PART TWO: The Never-ending Conclusion
As I continue to pay attention to what I need in my studio (to make it vortex of personal creative energy by opening the purest conduits to genius and thereby fostering my ultimate bliss,) I make adjustments.
I stand when I work, so I propped the tables up on bedrisers and topped them with HardieBacker board, a smooth and durable work surface. As a bonus, the higher tables make the storage beneath them accessible without groveling.
I can reach everything on all the shelves, no footstool required, and I am able to keep stuff nearest to its likely use.
I swung the decorating table 90 degrees to create more elbow room, found sturdy, stackable clementine boxes to hold everything on the shelves and labeled them, got rid of the odd-shaped wareboards, threw out the broken and moldy and gave away anything not often used.
Albert Einstein, an earthly genius, said, “Things should be made as simple as possible, but not any simpler.” In the spirit of simplistic balance, I am scrutinizing my remaining tool collection and questioning why I have 8 cut-off wires, 16 needle tools, 23 ribs, dozens of similar wooden modeling tools, a deep drawer full of sponges and a whopping 212 brushes – I just counted them!
I think the bulk of these need to go. They are going.
In practice, I only use about 20 favorites from all categories, which I keep handy on my right side along with my water tub, spray bottle, sponges, hand towel, brushes, slip container, and a cache of beloved sticks, straightedges and dowels. It’s an artist’s version of a mise en place, which works really well and I have begun to hone.
I now drive a custom cockpit of ceramic creation. Here’s a non-action shot (because an action shot would be less clear.)
A way of working that works
My entire studio is becoming a pretty decent personal version of Japanese workplace organization called 5S Methodology
1. Sorting (Seiri)
2. Setting in order (Seiton)
3. Shining (cleaning) (Seiso)
4. Standardizing (Seiketsu)
5. Sustaining the discipline (Shitsuke)
There are three other Ss that accompany this methodology: Safety, Security, Satisfaction. While they mean something different for factories and schools, I see them more as positive emotive qualities, emanating from the newly organized and clean space, helping me feel professional by fostering my sense of privacy, comfortable confidence and pleasure in my craft.
It’s a practice, this studio functionality perfection biz, but, I swear, now that I don’t need to kick a fire lane in to the work area every time I enter, only to stand there both fog-brained and hyper-distracted – essentially pre-defeated by the disarray – I’m making better art and having a way better time at it too.
This website uses cookies to enhance user experience and to analyze traffic on our website. If you continue to use this site we will assume that you are happy with it.