This Cracks Me Up

Celadon glazed cracked pinch pot
Walking Meditation Pot XXII, Liz Crain, 2017


In my very first ceramics handbuilding class I sat at a large table which included a bunch of newbies like me plus one know-it-all wheel-thrower. I have not met a didact with a more tone-deaf need to expertsplain than hers.  I was still in my Clay Wonder Years, falling in love and wanting to get lost in it. I relished how the outside surface of my pinch pots cracked as I expanded the clay from the inside creating intriguing organic possibilities. But my delight was soon doused with her continual instructions for crack banishment. I avoided her as much as possible, working outside on nice days and making full use of open lab time when she was not around. It took me awhile, but eventually I found the words to counter her: “Thank you, but I don’t learn by having the answers first, and, oh, I LIKE CRACKS!”  I repeated it with a cheesy smile at every unasked-for comment and finally she quit schooling me and turned on the other hapless noobs.

Read More >

Share this:

The Courage to Dis-brand

Truth Courage Justice Apothecary Cans


An allegory: On one especially memorable family vacation when I was a pre-teen we drove from CA to WI (and back, but that’s another story) camping each night along the way.  Donner Memorial State Park in CA.  A last-minute offroad spot outside of Salt Lake City (with cows and a babbling brook.) Somewhere high in the Snowy Range in Wyoming, where we got altitude sickness. And then there was Nebraska, which was flat and took all day to cross.  US80  (now I-80, but also known as the Lincoln Highway, Oregon Trail and California Trail) is an old road and in Nebraska there are 72 miles of the most absolute straightness in all of the Interstate Highway System, not varying by more than a few yards. Back in the day it was still a field-flanked two-lane clogged with slow-moving farm equipment and a town with reduced speed limits every ten miles. I stared out the back window of our 1956 Ford Country Sedan Station Wagon at the endlessness of the landscape and at the huge wall of black clouds that followed behind us in the west the whole inching way. We kept just ahead of the thunderstorm until we stopped and set up camp for the night at some tidy midwestern roadside wayfarer court where every car there was from California. Then came the deluge. It wasn’t like you couldn’t see it coming!

Read More >

Share this:

I Don’t Throw Pots…But I Review This Book

Mastering the Potter;s Wheel book cover


Why would I, a longtime confirmed handbuilder-of-clay, seek out and buy a book dedicated to wheel throwing? Am I switching teams? Not hardly! I have no intention of throwing pots.

So, then, what gives? And why this particular book? I’ll explain.

Read More >

Share this:

Making A Press-Molded Wad Pot, A Pictorial/Instructional Essay

Oh boy! Wet clay, fresh out of the bag! The smell of it reminds me of vacations by Sierra lakes and rivers. Decomposed granite, water and rotting organics, mmmmmMMM!  This bag of lovely Sandstone Buff is from Quyle Kilns in the California Motherlode town of Murphys, so my nose is right on.

Fresh clay like this is sticky, mushy and makes great slime if you get it wetter. It takes any impression, any shape and, if it’s not piled too high or too thick – or if it’s supported – it holds as it dries. We’re not sure just how humans began to take advantage of the fact that clay changes in the fire,  but we know  that raw clay lined many Neolithic holes in the ground or baskets, the world over, and accidentally got baked hard. This particular feature of wet clay is a not-so-hidden agenda in the Beginning Ceramic Handbuilding class I’m currently teaching. First Project, after all the intros, handouts, clay studio tour and ground rules? The Press-Molded Wad Pot.

Forgive me a few more words and then onto the eye candy.

This way of using fresh clay is so obvious it’s almost NOT a clay handbuilding Official Method. At best it gets a sidebar or an “Also Try This” mention in the dozens of  books and websites I consulted for deeper understanding. Sometimes that mention is in the Coiling chapter, sometimes in the Slab working chapter. It doesn’t really get respect.

It deserves better and I’m giving it that because it’s a fabulous and supportive (pun intended) way to get comfortable with the forming properties of clay besides making lumpy mudpies. It  lets clay be clay and learners be learners. It directs attention to good clay skill-building: evenness, surfaces, top edges and drying, but keeps some training wheels on to help a thoughtful ceramic artist have the full experience AND a successful result. Here’s a pictorial walk through the only thing I’ve ever heard it called besides simple press molding: A Wad Pot.


Get yourself some wet clay, about 5 pounds, any kind. Find a container with an even top rim, without undercuts – so your pot or bowl will slide straight out of it and not get caught – like this “Popcorn Bucket” from the local dollar store. You can also use traditional plaster or wood slump molds. You’ll need  some thin plastic if your container isn’t made of something porous that will release the clay. Gather a few rounded sticks or spoons as smoothing devices besides your fingers. And start in.

Open that bag of clay and inhale deeply, just because. If you need to, line your mold with the thin plastic. Don’t worry about how wrinkled or folded it is, that’s part of the texture the finished pot will enjoy. (And a little secret: you can remove this wrinkling later by smoothing the outside if you’re called to it.)

Grab a random-sized pinch of clay, maybe the size of a golf ball. Mush it around (aka: kneading). Pat it into a flattened shape,  1/2″ or  less thick and place it at the bottom of your mold. Do this over and over, lining the bottom and sides of your mold. Pressing the edges of each piece into the others, smoothing and linking the surface only as much as you want. Feel where the thick and thin places are and adjust accordingly. You will go back over it all when the mold is completely lined.

So, fast forward to a finished top rim edge, smoothed and strengthened, a bit of drying and an un-molding. Here’s what you’ve got:


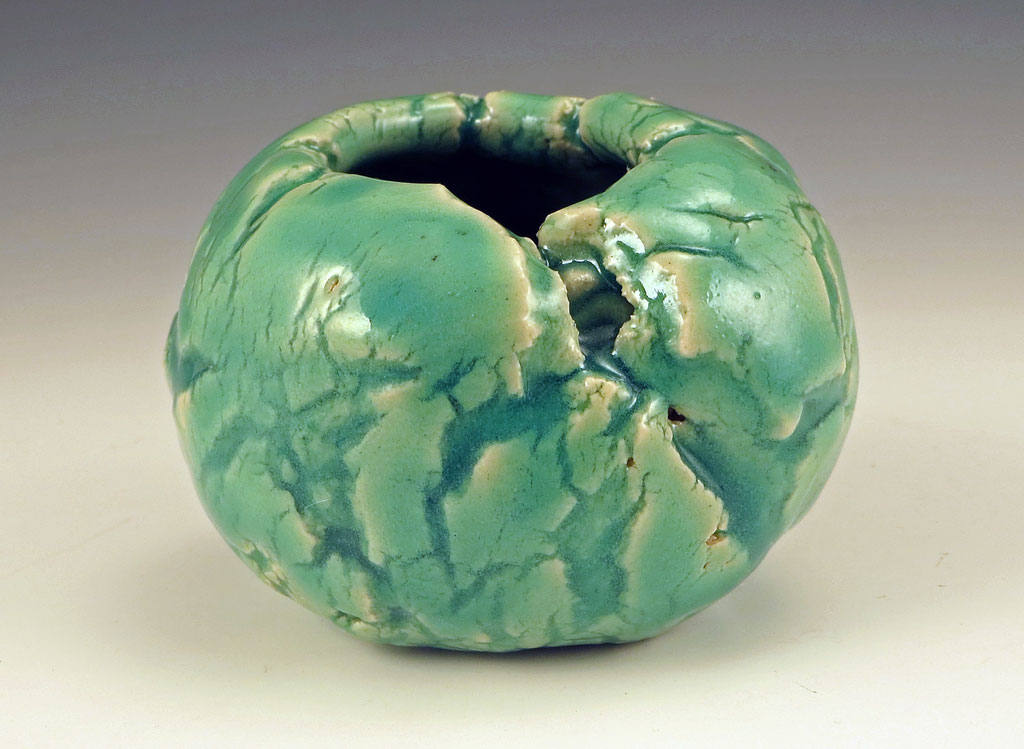
See all those great creases and wrinkles? Leave them alone for a great natural surface…or smooth them with a rib if you must. Press the bottom in a little so it will sit evenly and sign it.

I’m thinking you left the outside alone, so here’s the bisque fired version, wrinkles intact.


What serves to decorate this kind of pot and honor it’s hard-won (or is it hard-left-alone?) surface texture? How about a patina wash: thinned iron oxide wash brushed on and then lightly sponged off to leave it mostly in the cracks? It’s OK to glaze the smooth inside if you like. And that would look like this:


So, there you have it. An awesome and supportive first project for beginners….or anyone else needing a fairly assured way to make a pot. And quickly!

Variations are legion. Use different mold shapes. (Just make sure your clay will release easily.)  Use evenly rounded wads or coils or “floils” – flattened coils. Smooth the outside cracks. Add stuff to the top rim. Change the shape of the pot once it’s unmolded: square it up, push out from the inside, you know what to do. Don’t smooth the inside as much. Add handles or a top rim edging. The beat goes on.

As I finally get to posting this, my class is 2/3 over and going quite nicely. The second and third projects: Traditional Coiled Pueblo Pots and Pinched Japanese Style Teabowls have been introduced and students are working to finish and decorate to suit. More on the rest of the whole experience soon, of course.

Happy Clay Trails.


Share this:

It’s Complicated: Distilling 30,000 Years of Ceramic Art into a Six-Week Beginning Handbuilding Workshop

OK yes, that title is a tad dramatic. But it’s not a needy and exaggerated untruth: I’m actively sorting and defining what I know and enjoy about the entirety of ceramic arts in order to hone in on the heart and soul of this Beginning Handbuilding class, taught by me,  starting at the end of this month.

And this week that honing process hit critical mass. It felt a little like peeking into a ramping raku kiln and watching for the powdery glaze on the pieces to liquify, come to a bubbling boil and then to smooth out again as both it and the ware it is coating becomes blastingly red-hot. And THEN comes the moment to shut off the gas and pull the pieces with tongs into their garbage can reduction chambers. Most of you ceramicists out there will understand this reference, but if you need a visual, here’s a good one.

All this week I gathered and listed and piled and flagged.  I re-piled and sorted and started a board of sticky notes detailing each project’s intended trajectory through the weeks. I assembled the needed demos, quotes, glossary, Important Things to Know and on and on. I culled (which was clearer and easier now) and kept the best.  A Beautiful Mind got nuthin’ on me!

Last post I talked about how this class-formulating process amasses information. I think I mentioned something about comparing the ceramic teaching process  to cooking show demos, but I’m reporting in tonight that I’m not quite ready for that one. Maybe next week. I HAVE made one sample of a Press Mold Wad Pot, which you can see below,  but now I realize it’s the first of several needed to provide tangible illustrations of the important stages of just one of three comprehensive methods and techniques I will be teaching.

Press Molded Wad Pot at leatherhard

And that serves my personal understanding of Full-Service Ceramics. Sometimes students can connect the dots, but I find in ceramics it’s not all that easy. The whole process is un-obvious, far-ranging,  deceptively sidetracking and negotiable.

But that’s also the most important clue for me as as Interpreter and Guide: first and foremost, I need to have a profound and undistracted personal sense whereof I speak. If I gloss over, give the short shrift, make assumptions, it does not do the job in that satisfying way. I think I am connecting my own dots, retrospectively. As a matter of fact, I could re-title this post Things I Wish Someone Told Me Right Away.

And even then, the only way out is by doing it. So while I prepare and attempt to perfect my offerings for my new class and students, ceramics has also taught me to be more comfortable with imperfect and unexpected outcomes. With learners of all ages, that’s nearly a given. Years of helping clay handbuilding students has told me this amount of preparation is no less than the right amount, as cloggy and complicated as it can be. I’m glad it’s ONLY 30,000 years I need to review and condense and, like I said, I’m enriched and privileged to do it.

Class Nuts and Bolts: 6 Thursdays, 2-5pm, Session I: Feb 23 to March 29, Session II(with different techniques, projects and subject matter I still have to formulate): April 12 – May 17 held at the Santa Cruz Mountains Art Center, 9341 Mill Street, Ben Lomond, CA,  831-3364ART.

If you’re so inclined, you can call or register online at www.MountainArtCenter.org. Class is $180 for Members/$200 Non-Members.

Next time: Those visual aids!

Share this: