If you think that generating thousands of just-right tiny chunks of dried clay in order to have ceramic aquarium gravel is madness, you would not be far wrong. But it ends up the rewarding kind of madness, as you shall soon see.
I really did not think this through! But how could I? No one I know and no one they know has done this, so it has been necessarily one foundering discovery after another.
After hand-generating the gravel, those buckets of tiny bisqued chunks need coloring. But glazing them won’t work; the glass-forming ingredients in glaze will simply fuse them in a lump to the kiln shelf. A rookie mistake. Perhaps a nice effect when done on purpose, but for another project. (Hindsight Hint: generate the next batch of aquarium gravel with pre-colored clay and call it done!)
If I couldn’t use glaze, then would mason stains, oxides or underglazes stick well and evenly? The viscosity of underglazes can be thin and take three coats to cover well, but they seemed to offer the strongest color in the easiest format.
At the first try, the bits got too wet and wound up unable to bind with the color. It looked a little like bluish barf: color in a flat puddle punctuated by the pinkish chunks. Dang. I let them dry overnight while I felt a bit queasy over it. I considered the possibility of resorting to acrylic paint….but that thought both freed me and bolstered my resolve to find a fired-on solution.
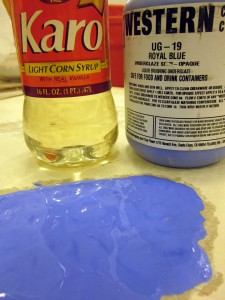
I talked with the deeply resourceful Gail Ritchie and we agreed we needed to add something which would sticky-up the underglaze, but not be glassy in the slightest. We came up with CMC gum fixative, Karo Syrup, honey, maple syrup…..all of which we theorized would help the underglaze attach while it dries and then burn away in the kiln, it’s job done, leaving the gravel in beautifully-colored separateness.
Karo Syrup was handy. Karo worked! Best use for Karo Syrup since homemade popcorn balls.
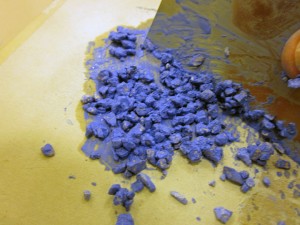
I added a few large drops of Karo to about 2T of underglaze…stirred well, and then mixed in the gravel sample to make a thick and dry-ish sticky mound.

For most of my samples, I used a heat gun to gently dry and separate each pile and then handled it as little as possible to avoid knocking off any hard-won color. I left one pile wetter and fully connected, just to see if that mattered…and while every sample fired up evenly colored and separate, the wetness of that one damp batch left a lot of color on the kiln shelf, which I needed to scrape off and re-coat the shelf with kiln wash. It’s worth it to dry things before firing them.
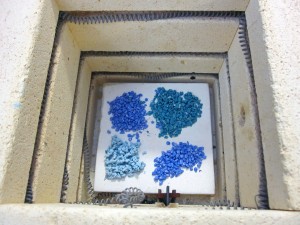
Here’s what the little test kiln known as Sparky looked like when I opened it the next day. So fine!

Ceramic aquarium gravel-making has been the full creative catastrophe, with a happy ending. I’ve worked harder both physically and mentally and it’s taken scads more time than expected. Ironically, this gravel is only a bit player – pun intended – in the finished ceramic Aquarium Set-Up For Sale piece I envision. In that respect, it’s like fine silk lingerie, something usually only the wearer knows about, but great for self-confidence.
Every speck of ceramic aquarium gravel represents the whole effort to me now and I find I cannot let even one fall off the board or over the edge of the kiln shelf. They’re shards of meaning and intent, like artistic DNA, each carrying the whole idea.