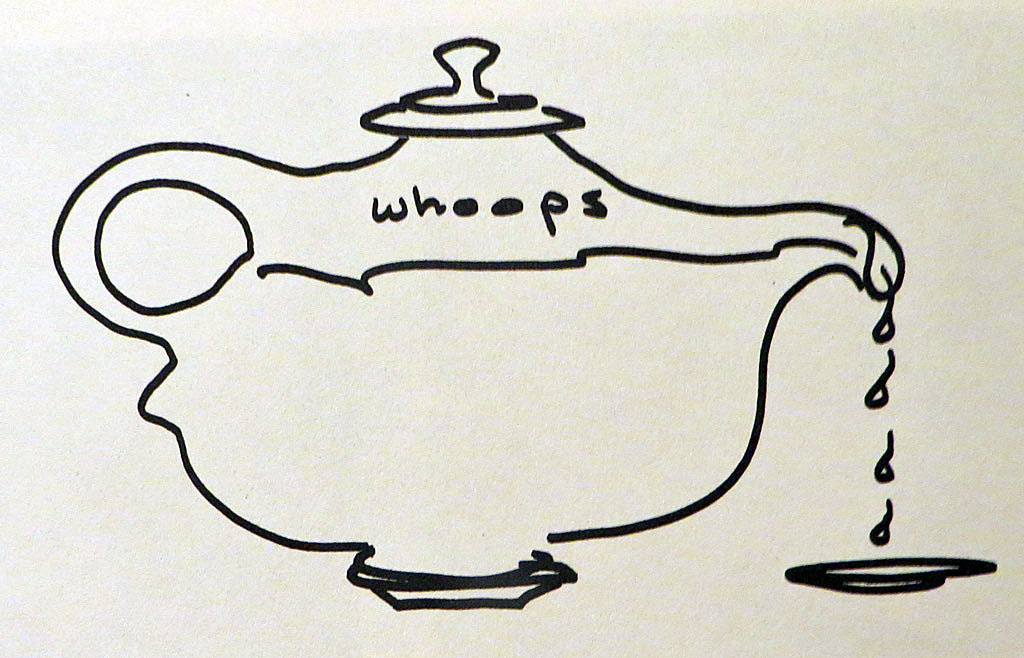
The spouts of functional pouring vessels have to do two things: deliver well and hopefully look pleasing. Stint in either task and ya got problems, some less bothersome than others. And after my last post about the snub-spouted Cube Teapot, it might be manifestly simpler to say that functional spouts really have only one thing to do: pour well, if not flawlessly.
So what, specifically, goes into a smooth-functioning spout, whether on a teapot, pitcher, ewer or creamer? Yes, style still counts, but for now we will just explore how precise forming affects better function.
Delivery of a liquid from a pouring vessel is ultimately all about the flow: containing, facilitating, directing and controlling it. The concept is simple: provide a smooth, continuous flow, beginning to end. There are scads of descriptions on how to achieve this, but the best words I know of come from Ben Carter‘s book “Mastering the Potter’s Wheel: Techniques, Tips and Tricks for Potters.” (Voyageur Press, 2016.)
“From a purely functional standpoint, a spout is an exit for liquid to leave a pot. There are a variety of shapes a spout can take, but all spouts have two core parts: the throat, which is the wide attachment that faces the pot, and the lip, which is the smaller opening from which the water is released. Both closed (teapot) and open (pitcher) spouts share physical characteristics that are based on the dynamics of flowing liquid. For a spout to pour well, the throat must allow enough liquid to flow so that pressure, and therefore speed, will be created through the act of pouring.”
Carter continues with discussions and illustrations of good form and construction methods, and thoughtfully includes a photo gallery and a skill building page which knits the elements of pouring vessels (handles, knobs and lids, open spout or closed spout) together. Even as a confirmed handbuilder, I find this book useful and reviewed it when it was first published.)
There is lots more spout-forming info out there for ceramic wheel-throwers, (the late Robin Hopper’s book Functional Pottery comes to mind, where the troublesome issue of the spiral twist inherent in a thrown spout comes up.) Throwing spouts is fine, but what if you don’t want to? There’s not much info available about the issues with handformed spouts, so I turned to sheet metal fabrication advice because it addresses similar problems from the pattern-making point of view. While metal has a ductility clay does not and forming from patterns is slightly differently accomplished, I was able to translate the basics. After all, a silver teapot or copper oiler needs to pour just as well as a ceramic version and the interaction of the throat and the lip, as mentioned by Carter, matter greatly in all media.
What follows are four annotated pages about “Factors Affecting Spout Function” from a gem of a book from 1978, “Form Emphasis For Metalsmiths,” by Heikki Seppä. Finally! A discussion and some construction techniques related to what I actually struggle with! Take it away, Heikki! And may you, Dear Reader, find a nugget or two to help you along in your spout-forming success.
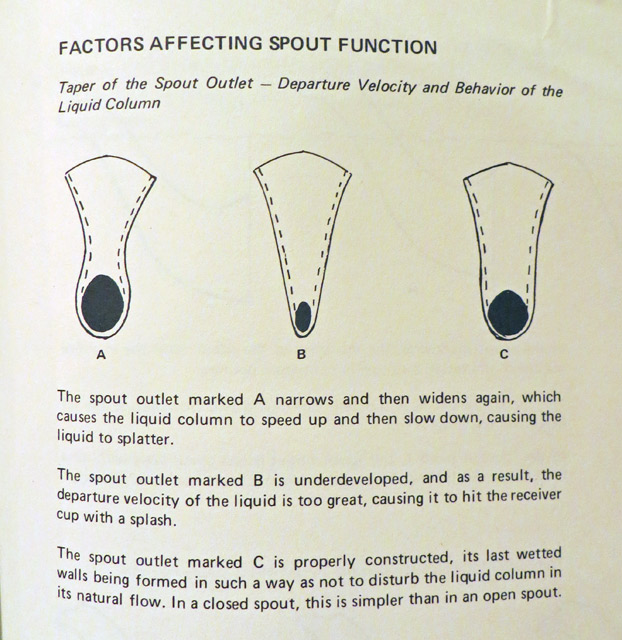
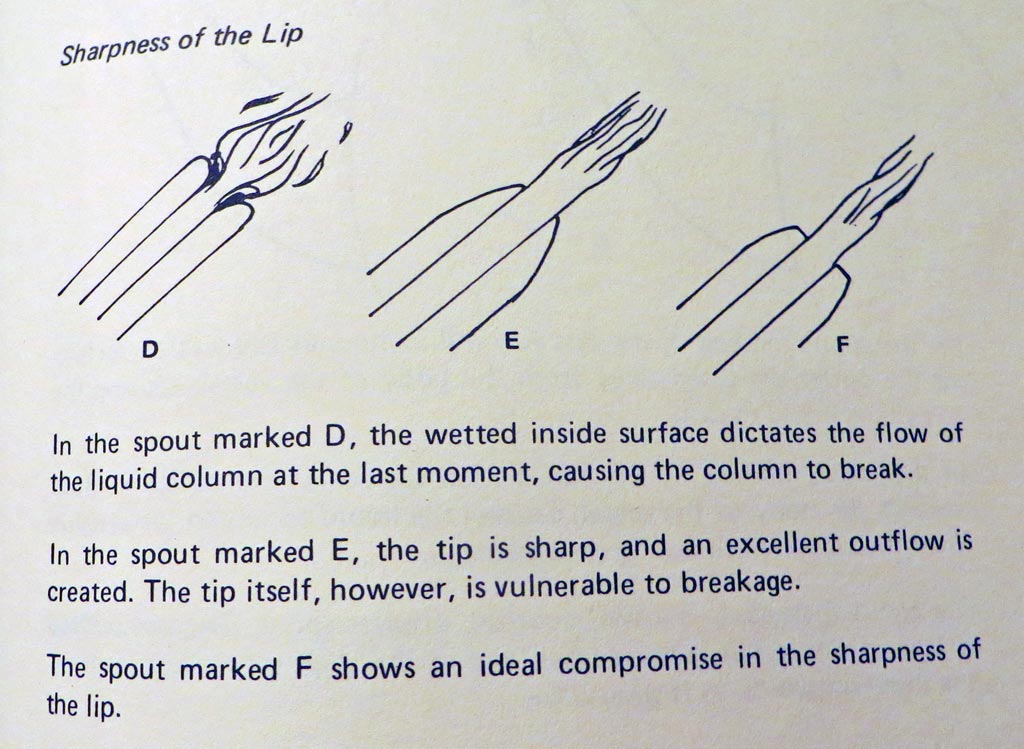
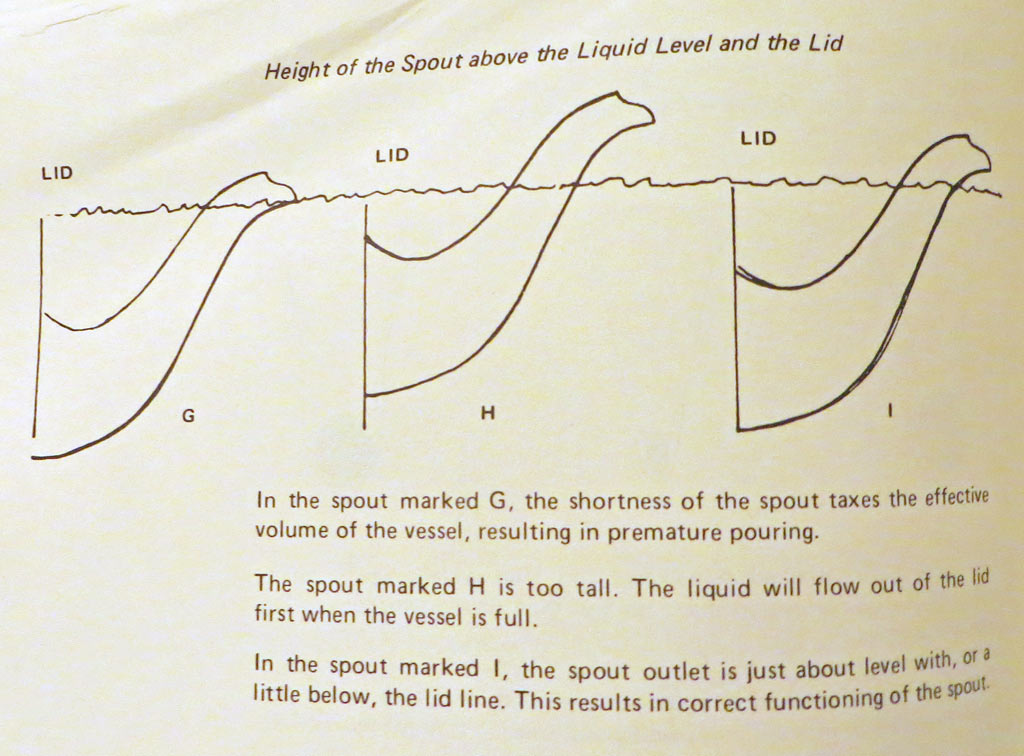
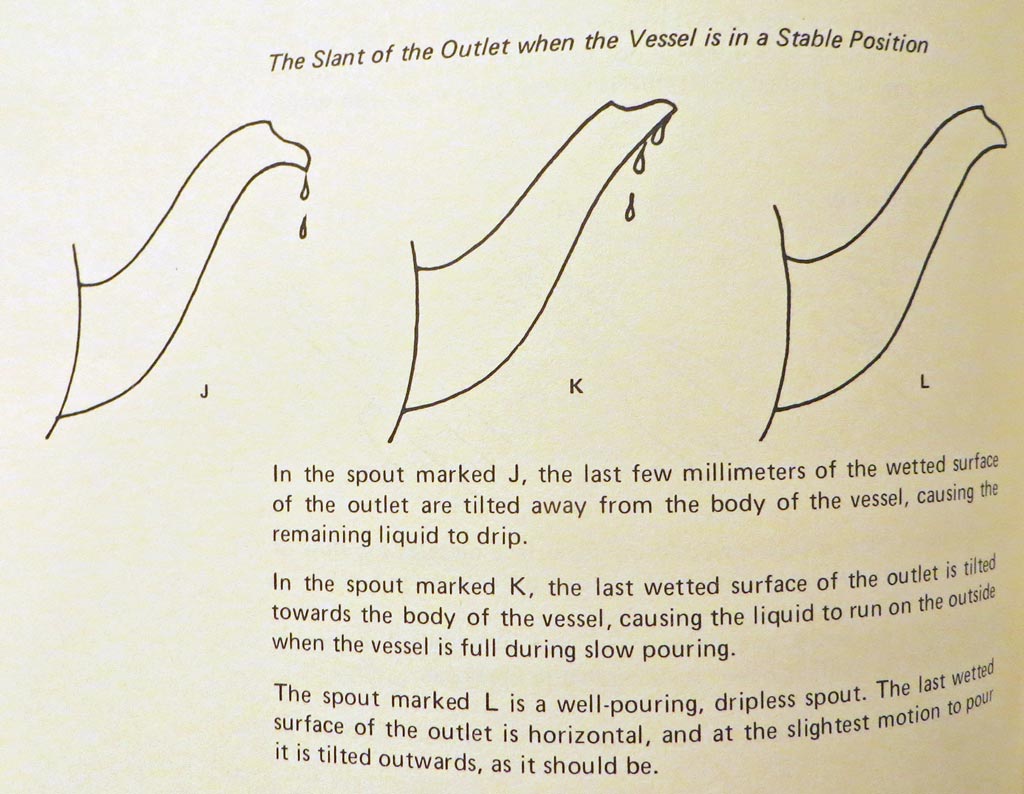
There are a couple of other ceramic spout handforming challenges: smoothing the interior seam adequately and making a clean attachment to the body of the vessel to name two, but it seems to me if one wants a spout bigger and more stylish than that on a Cube Teapot, knowing how to taper, angle and place both the throat and the lip properly – maybe down to millimeters – will go a long way towards pouring success.
-Liz Crain, who also enjoys the mindblowing Glossary of this metalsmithing book because the author is determined to incite those in his field to think beyond their own traditional forms and forming methods and add beauty and interest to their shaping. To that end he lists and draws examples of mostly organic forms with delicious names. Have fun googling Acanthoid, Byssoidal, Cassideous, Chelate, Conchate, Cymbiform, Ensate, Falcate, Hamiform, Hyperbolic paraboloid – my favorite because getting clay to curve in two directions like this is a challenge, – Infundibular, Lamellar, Napiform, Paten, Peltate, Ramose, Reniform, Rimose, Rostral, Runcinate, Spiracle, Strigal, Vallecular and Xiphoid to stoke your own inspiration. 🙂
I found the images incomprehensible which leads me to believe that the images I draw on the white board every semester are likely equally incomprehensible to others.
Best way to make good spouts is to make a lot of them and test and be critical.
LOVE the self-reflection regarding your class drawings as compared to these, Sam! It’s probably true that our current perceptions create the scaffold for our learning and interpretation and sometimes a sketch is too sketchy. As a beginning ceramic student I wasn’t interested in technical diagrams, anyway. I did not want to repeat-to-perfect much either, even in wheel classes (although I did.) My interests fell into the poetry of process, the thrill of discovery and personal expression. Teapots were the ultimate anathema and I avoided them for at least a decade. Yet somewhere in there I also got tired of simply making stuff and began paying closer attention to the forming, cracks, wobbles, drips and glaze faults, which always leads to your advice: make lots of them (pieces AND mistakes) and assess. This info helped by delineating what the base physical elements of a good spout were to begin with because I was finally open to that info. Always learning!
Very useful information – thank you for researching and sharing.
Yes, Kate, glad to be helpful. I wish I knew this years ago!
Good stuff Liz!
The only thing I would dispute is the simple explanation given for spout position ‘h’. If you think of a watering can for the garden, these can have very high spouts, and in fact *need* them to be located higher so that they do not spill when carried. The way these higher spots can be accommodated into a form is that they are long enough and far enough out from the vessel that tilting it does not overflow the ‘lid’ opening. Or, you can place the opening further back. Simple to do in hand building, but easy enough with thrown parts too 🙂 The limitations of a higher spout simply draw other variables into play. That is something which deserves to be explained as well.
Thanks for compiling this! Gonna share it on fb!
Thanks for reading along, Carter. I agree completely about watering cans, having made a few dangerously long- and high-spouted ones myself. I always thought of it as more of a style thing, but, as you have noted, it is not! I may ultimately add this info to the post, but today I want to go tend my garden!